[QUESTION] Tomato Rig

Hello folks, I wonder how did they manage to rig something like these tomatoes in the video. Has anyone have any workflow to rig something squishy like this?

My assumption was they used blendshapes for the facial expressions but I am not sure whether they used lattice or some deformer I dont know of for overall movement of the ball-shaped mesh.

Thanks and have a nice day everyone!

Hi Lethendris,

I haven’t rig something like this but I can offer how I would approach this.

RE: blendshape for facial expression.
That is pretty much the standard. With the joint controllers as tweaker controllers.

RE: squish overally
I’d do a squash and stretch deformer together with the lattice. Of course, this will also be under blendshape rather than as direct input the main mesh.

1 Like

There is no one special answer to this. It could be a lot of things. If you want to learn more about thinking of combining deformations in powerful ways, read The Art of Moving Points by Brian Tindall.

The face is likely a combination of blendshapes and other deformers. The body might be FFDs or joints or soft mods (assuming Maya) or whatever. It’s just a layering of stuff. Could be anything really.

I’d think about it in terms of layers. Have a simple sphere in the shape of the body. Deform that sphere with a big body-shaping set of joints or lattices or whatever. Pin joints to that surface. Those joints carry along the position of the eyes on the actual mesh. If you just throw an FFD on top of the entire mesh, the eyes will stretch.

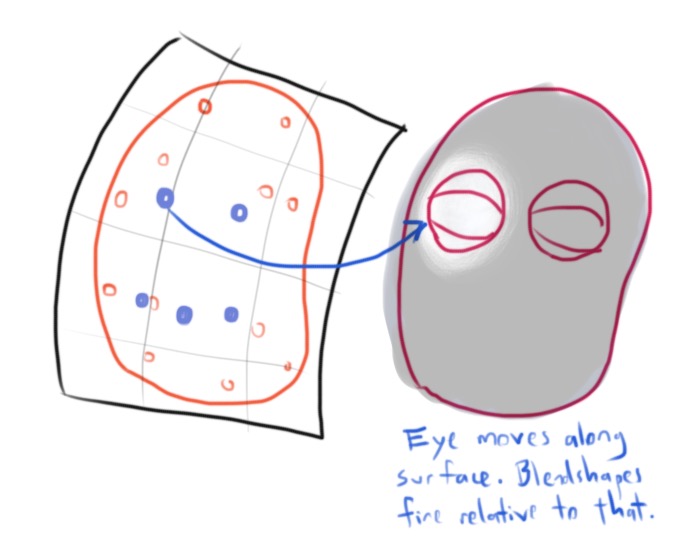
In this quick sketch, the red joints would be shaping the body. The black lattice is an FFD or stretch spine rig, or whatever. The blue joints would skin the position of the entire eye. And then add more joints or blendshapes to deform they eye, relative to that joint position:

First of all thanks for your answers guys. For I am new to tech-artists.org, seeing this kind of community brings me hope and excitement!

I definitely needed something like “how can I improve my rigging skills with deformers?” but with a little research on the internet, some people said it is so hyped and is nothing more than basic skinning tutorial. I am confused, and I do not have an apple device, does that mean I can never and ever reach the content of the book?

Thanks again for your effort that you even sketched it:hugs:. You said “pin joints”, is it something like rivet script because I am not that good with lattices, when I basically rigged a sphere with 3 joints(2 eyes on each side and one in the middle for head representation), and then add lattice deformer on the sphere, joints doesnt move along with the mesh.

Yeah rivets or follicles, closestPointOnSurface, closestPointOnCurve or some other new option you discover and write us a tutorial about in the future!

In some packages other than Maya, you can constrain objects directly within a deformer space.

Yeah Art of Moving Points requires an apple device, sadly, last time I checked. :frowning:

Thanks for your answer!

One last thing, would it really worth buying that book for a rigger?

I had a look at the Art of Moving Points. It is worth it. It also has videos included.
But again, the bummer is it is only available on an apple device.

You can also check vimeo of the sample videos of the book.
The author uploaded them.

Hello, i did similar rigs. What i did is build a spine, then attach a joint to the middle, this joint drives all the facial of the character. It’s only smooth skin work atfter that. Notice in the video that the arms are completely separated modules. Then you can do as Chris tell you, attach the modules via follicles, rivets, surfAttach or whatever you prefer.

Cheers!

Ssky.

I am having trouble when I skin the mesh with the joints, then parent the joints under follicles on the mesh and put lattice on top of the mesh, I am getting double transformations as I expected.

I tried creating blendshape and put lattice on that mesh, then created follicle on that mesh and parented the joint under it. Everything seemed to be okay but joints had no effect on the original mesh, thought it was about input order and changed it to calculate skin cluster first, then the blendshape and I got pretty inaccurate joint movement (Seemed more likely lattice border problem but I could not fix it)

And I downloaded that book and im almost half way through it. One thing I am having trouble to understand, I can do those 3-curve movements with joints for:

Brows - OK,
Eyelids - OK,
Lips - OK,

But once he explained the jaw, I am confused. Should I parentConstraint joints to the jaw and head bones and adjust the weight of constraints to get his kind of behavior?

I am sorry if my question was an overkill

The way I do this: In my drawing, the geometry on the left side is meant to be a nurbs sphere or a secondary mesh. That is the geometry you deform with an FFD.

  • The lattice bends the nurbs.
  • The follicles ride the nurbs.
  • The final mesh is skinned to joints that follow the follicle.

That is how I would avoid double-transforming the mesh.